projects

ready for the floor

This has been a long journey. But we’re nearly there.

After discovering we have had woodworm we treated the floors before going any further. It’s very unlikely the woodworm are still hanging around, there’s no sign that they are active, but just to be on the safe side.

Talking of safe sides… woodworm treatments vary but some of them are exceptionally toxic, to humans, plants, other insects (like bees) and pets. I did some research and looked into what I could get hold of fairly quickly and we opted for a middle-ground. It’s a synthetic insecticide and in lab tests if ingested it does harm small mammals and some insects but the claim is that bees will be warned off before they get near enough for the insecticide to do any damage. You have to wear gloves and masks to apply it, but within an hour it’s safe for all.

It didn’t give a ‘time to dry’ on the packaging but we anticipated from overnight to 24 hours. How wrong we were. Five days later and it was finally dry.

So we resume the process.

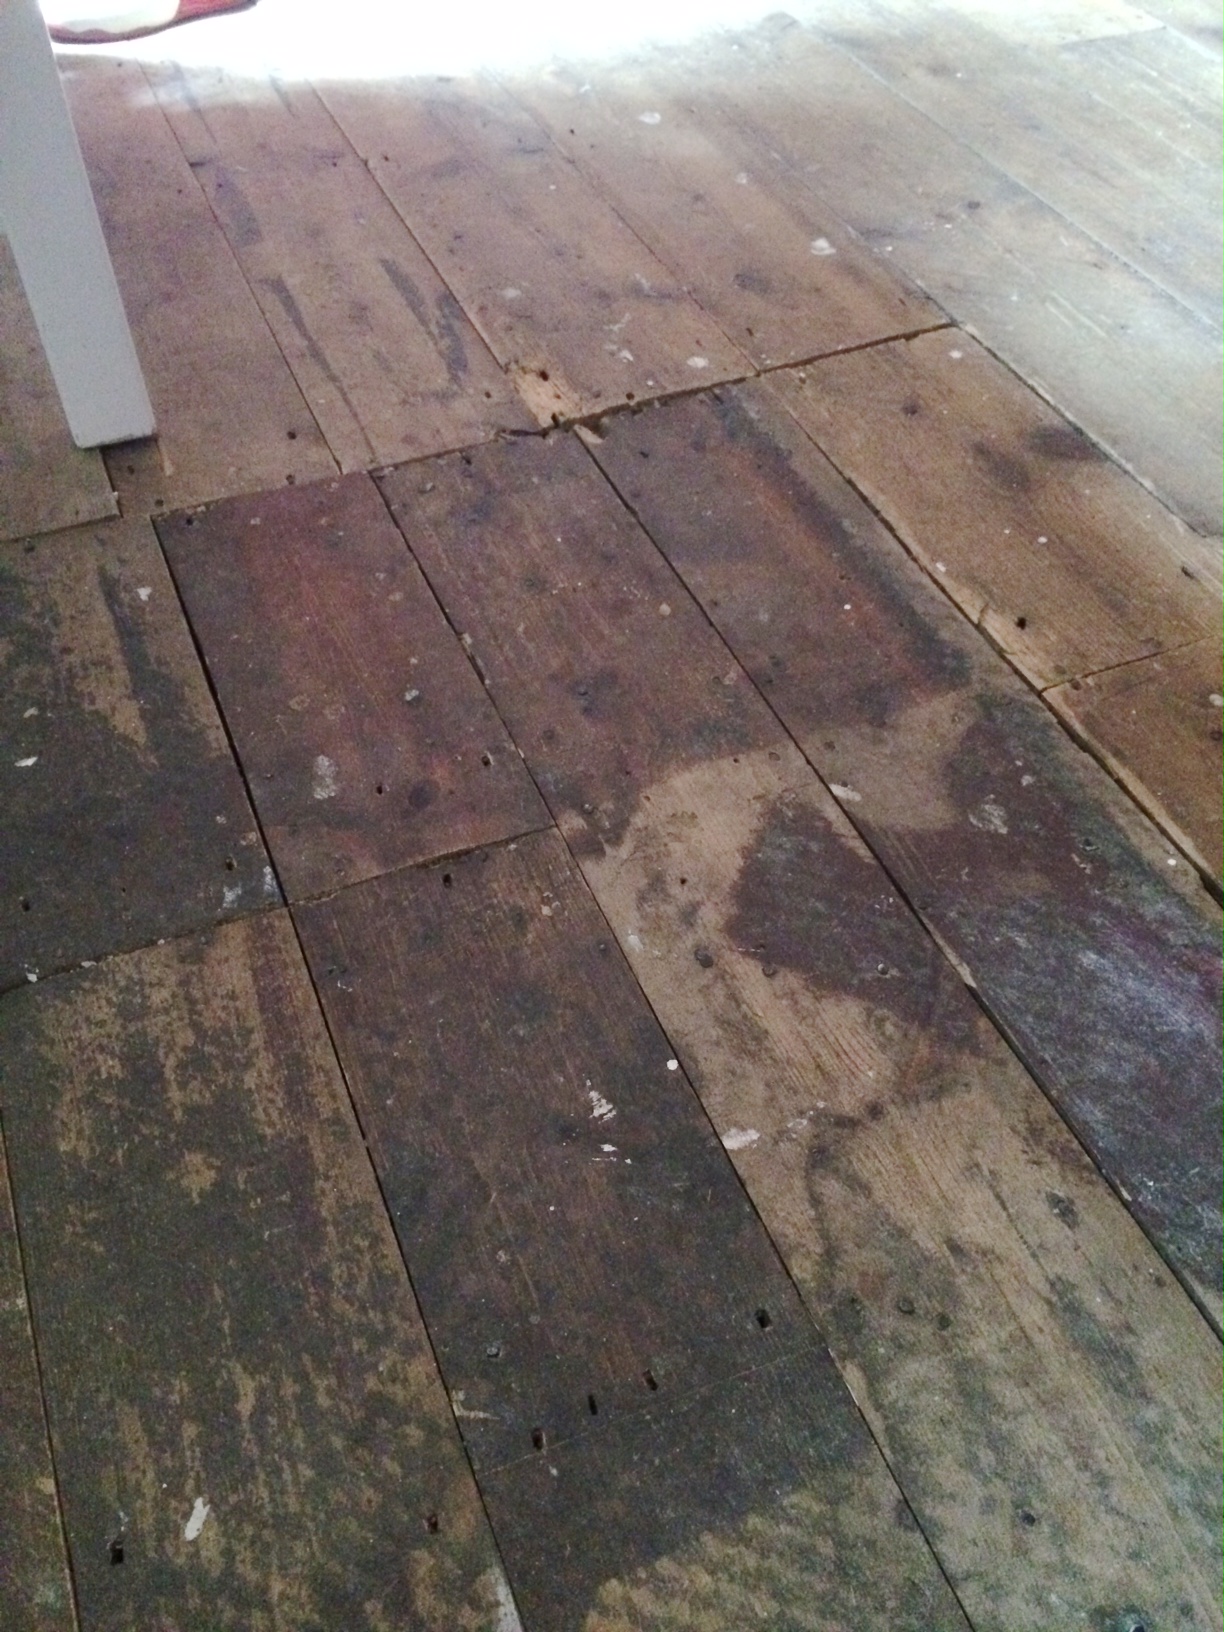
First up: wood hardener. Because some of the boards have exceptionally damaged patches we had to use this or risk one of us putting our foot through a floorboard in the near future. It still feels a little risky given just how fragile some of the parts are along the path that leads from the dining room door to the kitchen.

This is actually a ‘wet rot’ treatment, but Dad recommended it as an easy way to toughen up the flaking wood before applying the wood filler. booyaa chopped up bits of wood to make little bits of scaffolding for the most damaged areas. He slotted them in to keep the fragile wood in place while treating them.

The hardener darkened the treated areas considerably and we couldn’t tell if it was because it was still drying out.  After a week we decided that the dark patches were here to stay.

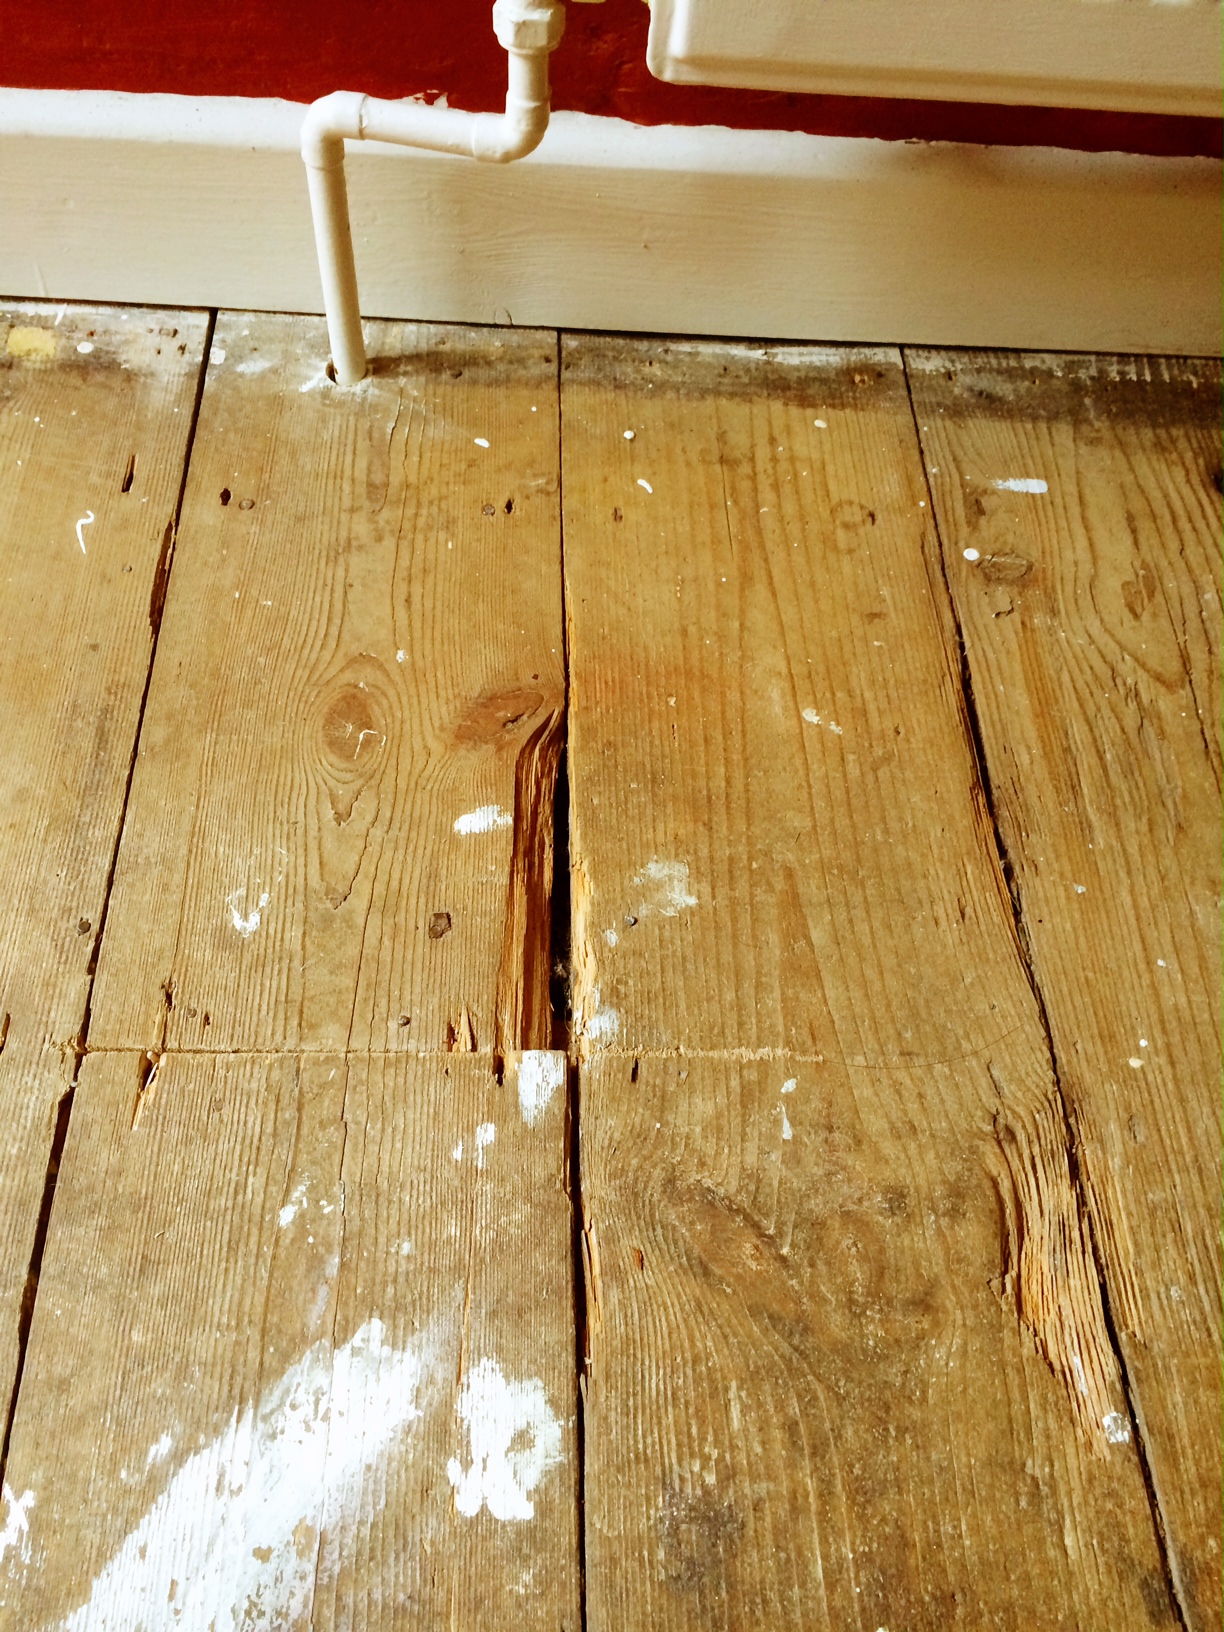
Some of the patches had toughened up a little. They were more stable and looked able to support the weight of wood filler. But there was one floorboard in particular that moved ominously if you stood on it. We finally plucked up the courage to investigate properly. That was when we saw that the board wasn’t just damaged on top. It was also falling apart on the underside. Lawks.

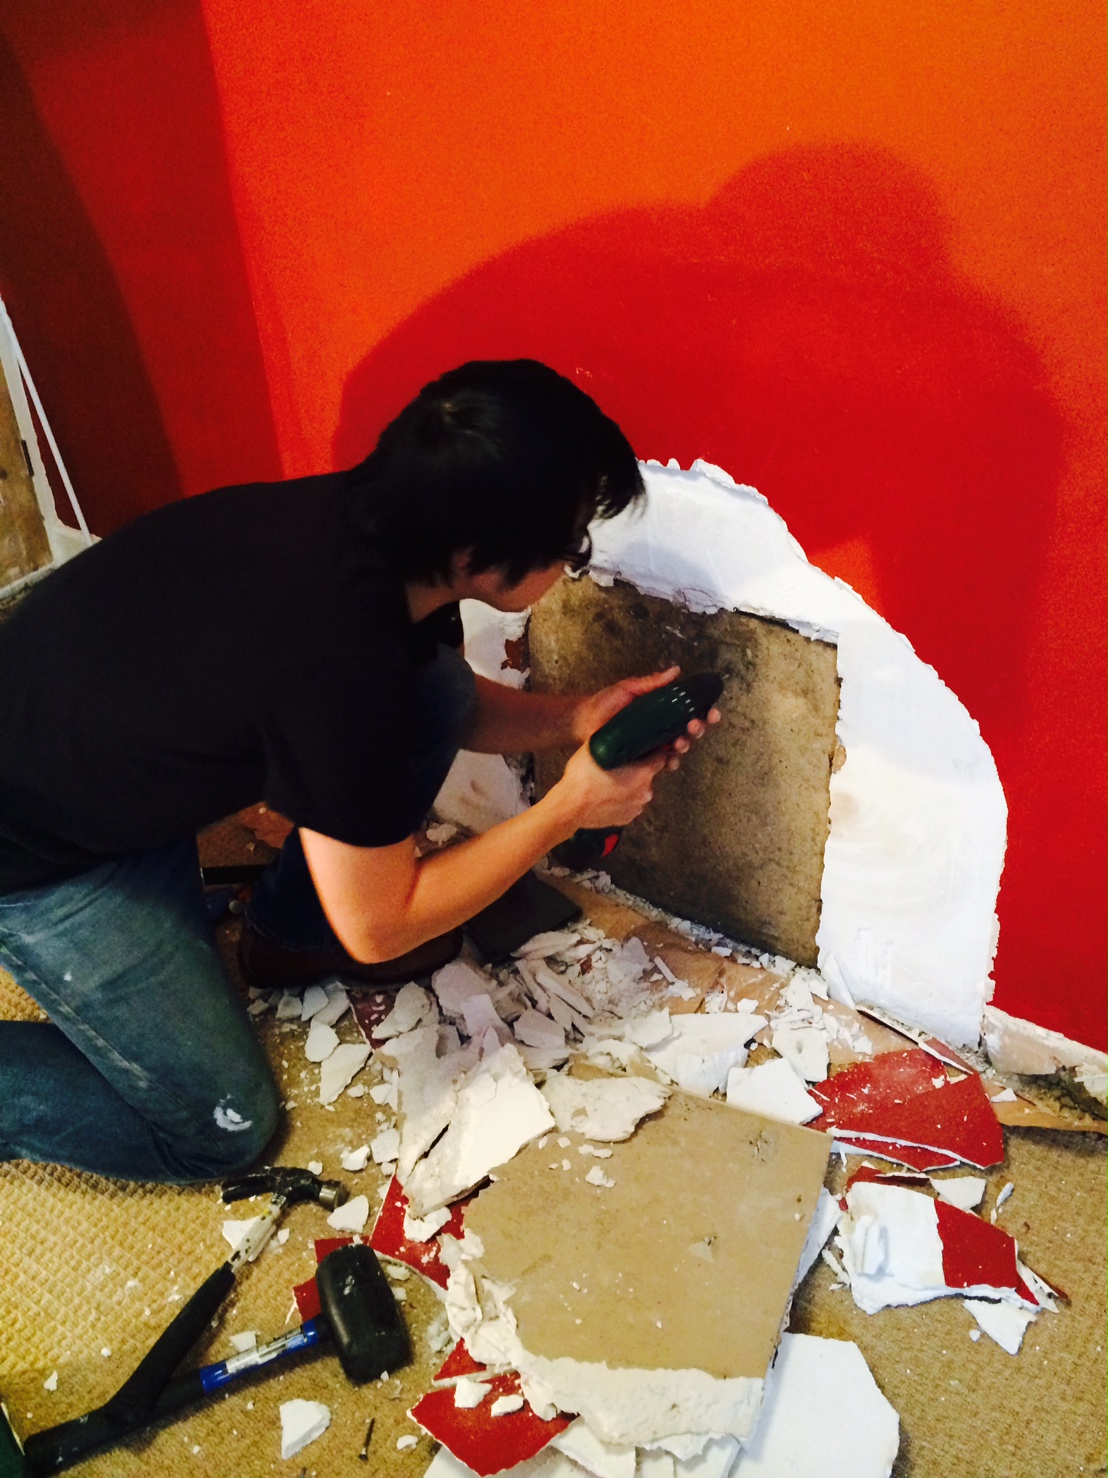
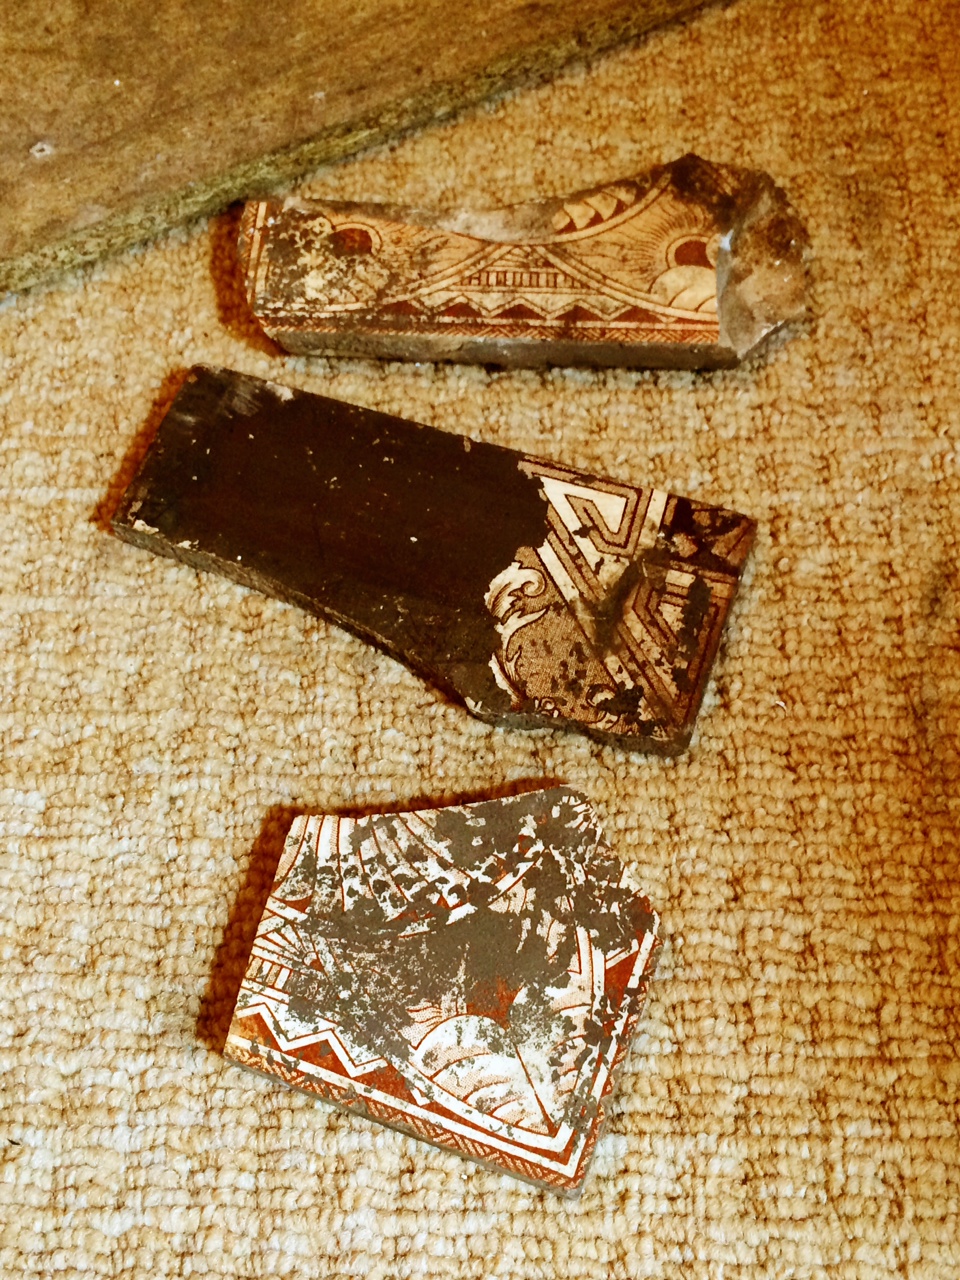
Much hand-wringing ensued. We decided that two or three boards were beyond repair. Time to bite the bullet. I called in Mr Joiner-Painter again. He said, “If I were you I wouldn’t bugger about. Pull these two…” prod, poke, mumble “probably these four boards up and replace them.” So that was that.

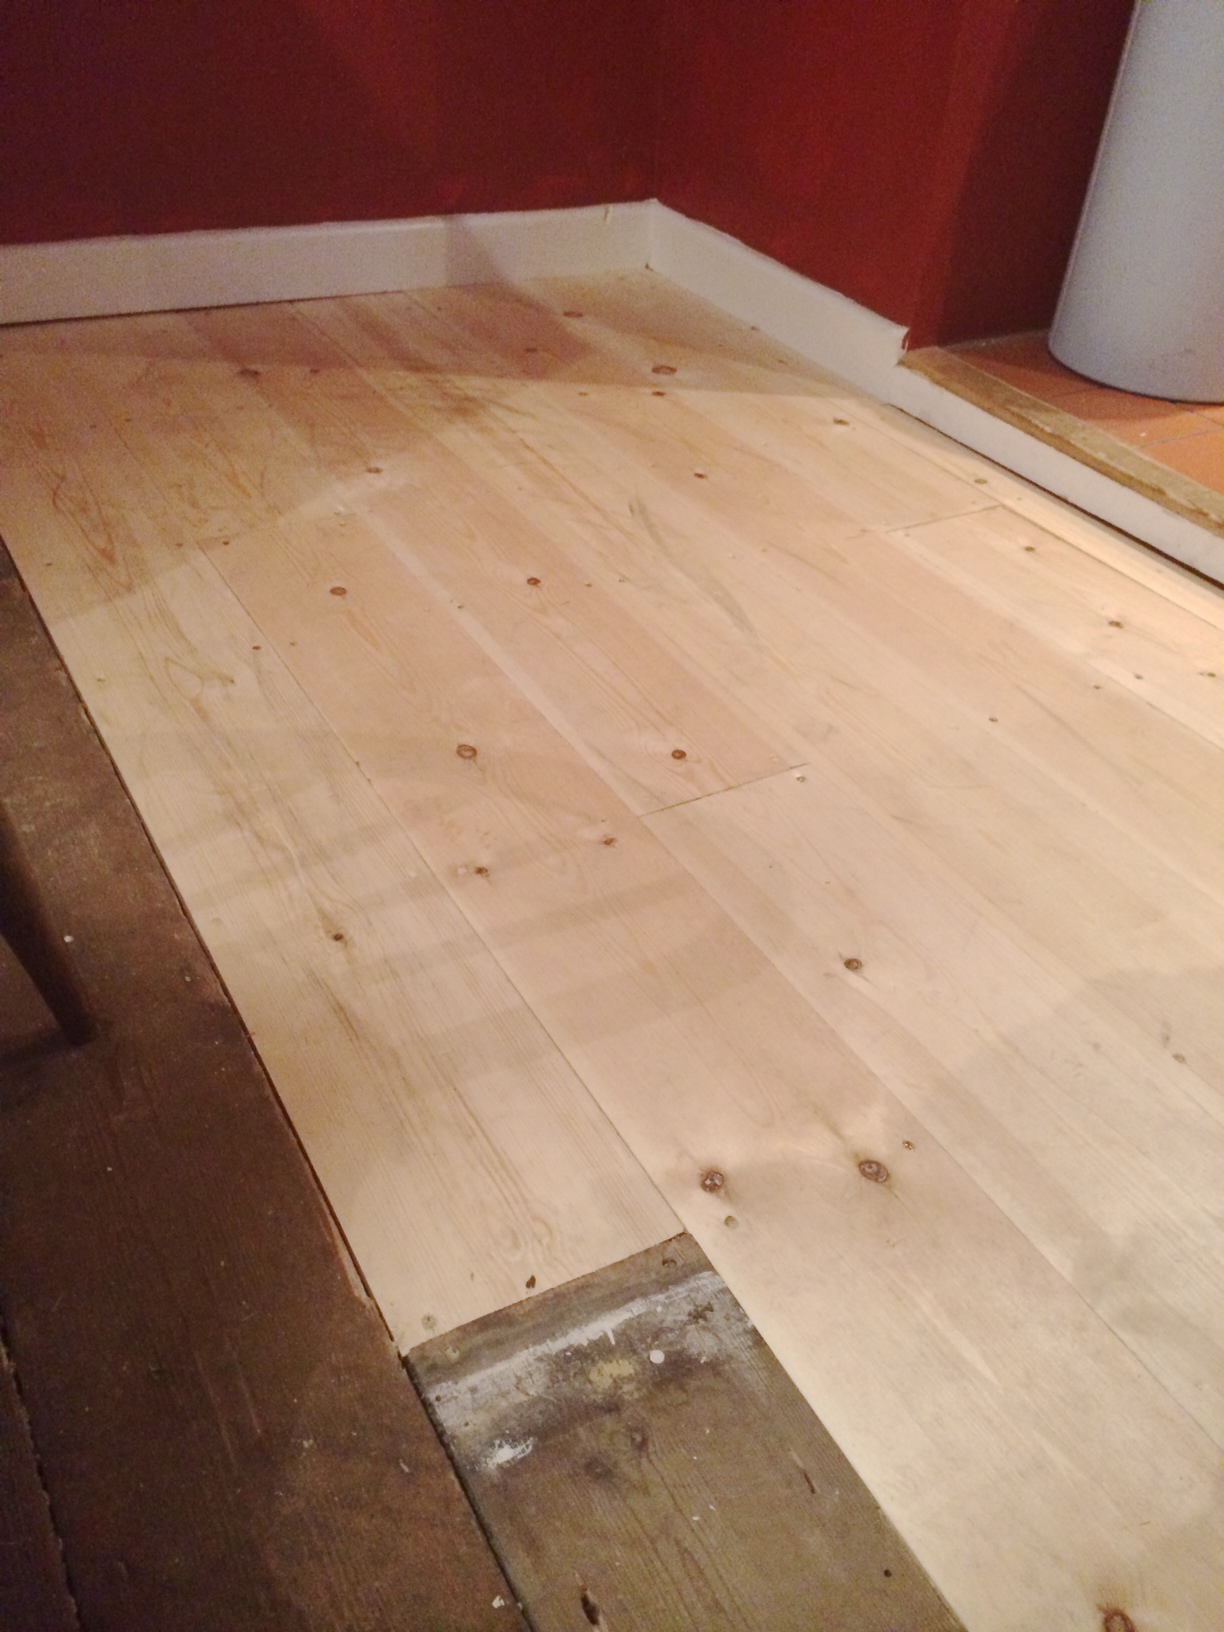
Mr J-P was booked in ten days hence to do more floor replacing. When he lifted up the boards he found what we’d expected, that the boards that looked ok from the top but felt wobbly to walk on were badly damaged underneath. But it was worse than we’d all thought. He salvaged what he could and we were left with one old board as an island in a sea of new boards, and then one third of the original floor grouped up to one side. 8 more boards had gone “next door”.

It was sad. And frustrating. And expensive. But I didn’t want an unsafe floor and it felt like we were spending time and money and not making progress. At least now we could get on with finishing the floor and use the room properly again.

On Friday night we cleared the room – again – so that we could get started first thing Saturday. I say first thing. By the time we’ve had breakfast and a second cup of coffee it’s always nearly midday by the time we actually do any work.

We finished off the few bits of sanding around the edge of the old wood, and gave all of the new wood a medium sand to make sure it was clean and ready for staining.

We used one coat of woodstain in ‘Victorian Pine’ on the brand new wood and left it to dry. We were hoping we might be lucky and the new wood would stain to match the old wood. Just like that. My backup plan was to do another coat of the stain across the whole floor.

I bought a floor stain brush and a big sponge for the stain application, having read arguments for both sides. We tried both and decided that the brush gave a better finish. The big chunky sponge wasn’t great for applying the stain but it was good for mopping up spills and excess stain.

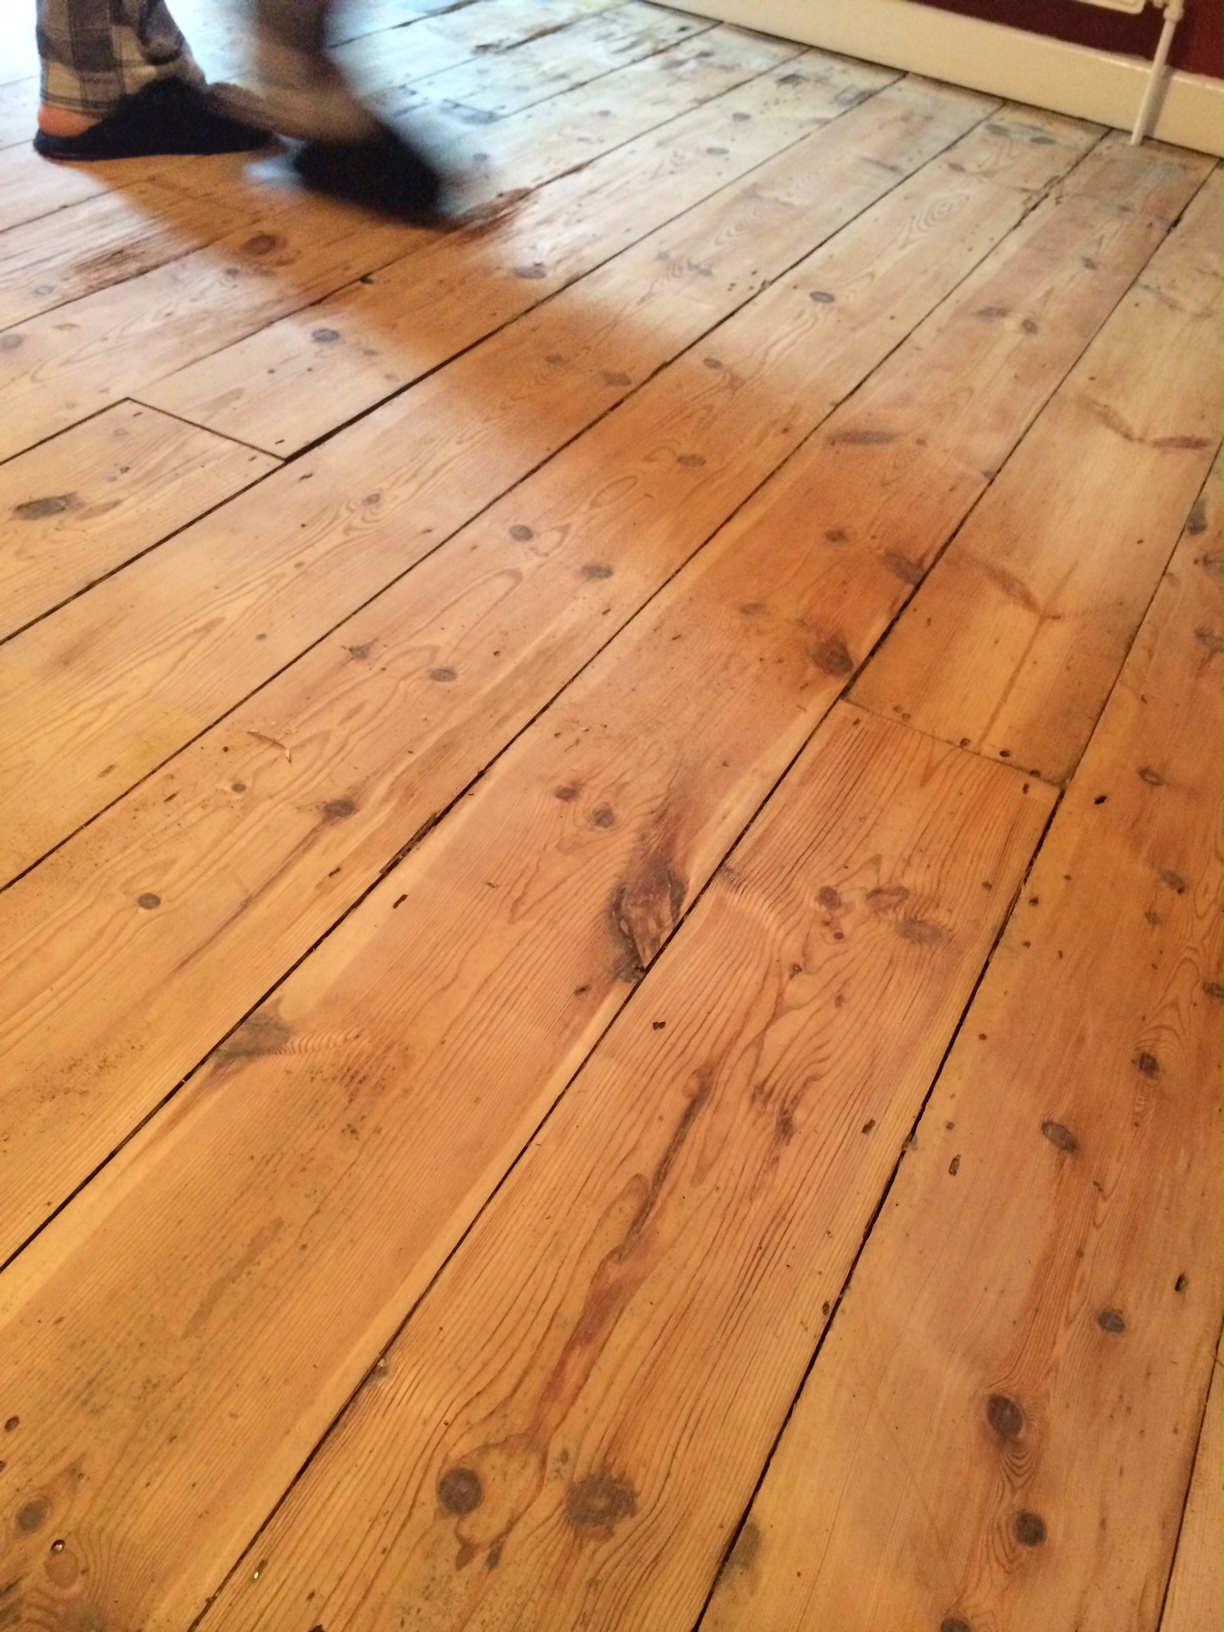
The first coat went on and the colour was an astonishingly good match. We were both impressed. And quietly relieved.

Once the stain was dry we were ready for the first coat of varnish. It’s not traditional varnish. It’s what’s called a “hard wax oil” which makes no sense whatsoever to me, but it’s an as green as you get combination of oils and waxes which will, after two coats, protect the floor as much as varnish would. The plus side, on top of the eco credentials, is that it nourishes the floor at the same time.

For the oil we bought a fancy applicator which is designed to make the job cleaner and faster.

One of the plus sides of this type of non-varnish varnish is that it doesn’t need sanding between coats. We also bought the fast-dry formula so we don’t need to avoid the dining room floor for 24 hours. Because that would be interesting, since the only way you can currently get to the bathroom is via the dining room… We tossed ideas around about how we’re going to manage with no access to the kitchen or bathroom for what could be up to 8 hours.

The obvious solution was for the drying time to be overnight. Make sure we’re ready for bed bar this last coat of varnish. We could have jars of cleaner for the brushes and hand wipes ready, as we have no access to water once the dining rooom floor is out of bounds. Once the varnish is on we go straight to bed. We can both sleep for 10 hours if we put our minds to it, so the floor would be usable when we woke up. booyaa’s addition to this plan was (are you ready for this?) that we get a chamber pot “for emergencies”.

The plan was to do the coats on consecutive nights.

We applied the first coat, which is supposed to dry in 4 hours if the room is sufficiently well-ventilated. Since we couldn’t think of a better way of doing it, we left the windows slightly ajar, thinking that with 8 hours to dry it would work out fine. And it did.

But our consecutive nights plan was somewhat scuppered. The quantities recommended for the size of our dining room were hopelessly underestimated. We ended up leaving it at one coat and ordering another can of not-varnish and doing it two days later.

Same game of getting ready for bed and doing the varnish at 10pm and crossing your fingers you didn’t need to go to the loo in the middle of the night.
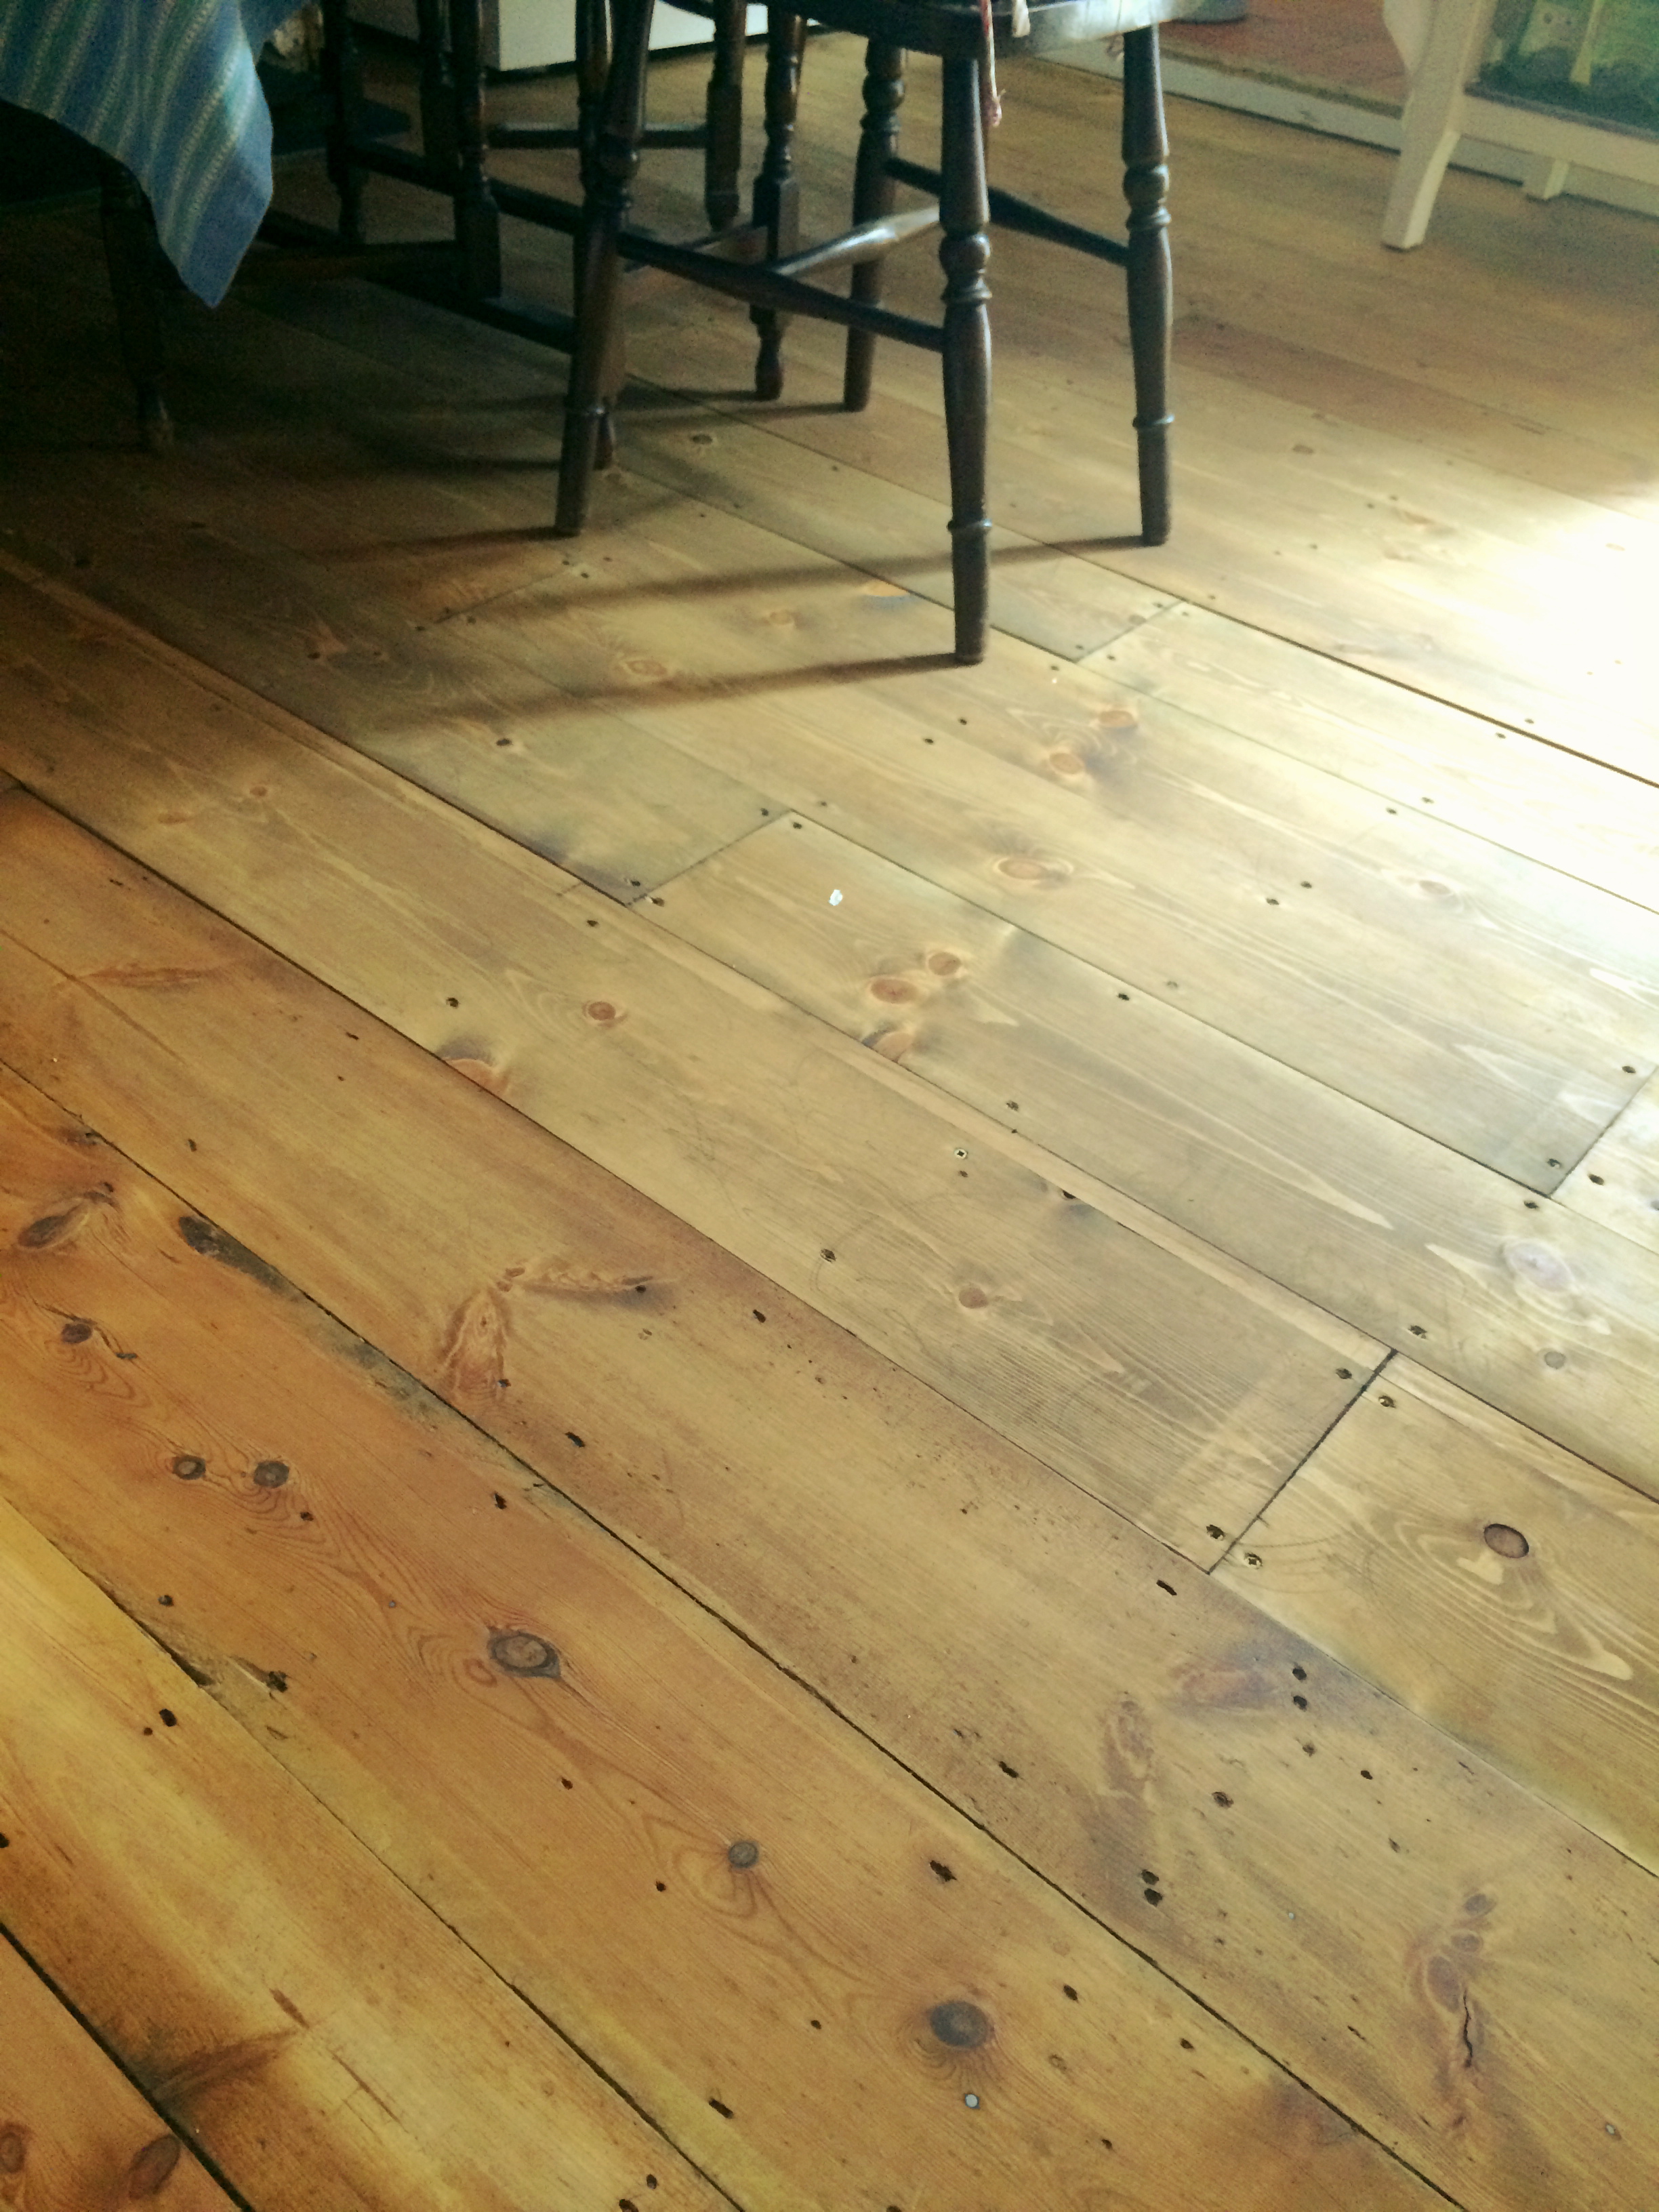
Look Ma, no holes!

Look Ma, no holes!

The final result is a very subtle matt finish. In a few places where the varnish went on a little thick there’s the merest hint of sheen. Mostly it looks like it’s bare wood. After applying the not-varnish we noticed that the original boards have a red hue which the new boards don’t have, so there is a difference between the old part and the new, but the new boards still, miraculously, look aged.

Old boards (nearest) against new boards. And a hobbit's snuck in there too.

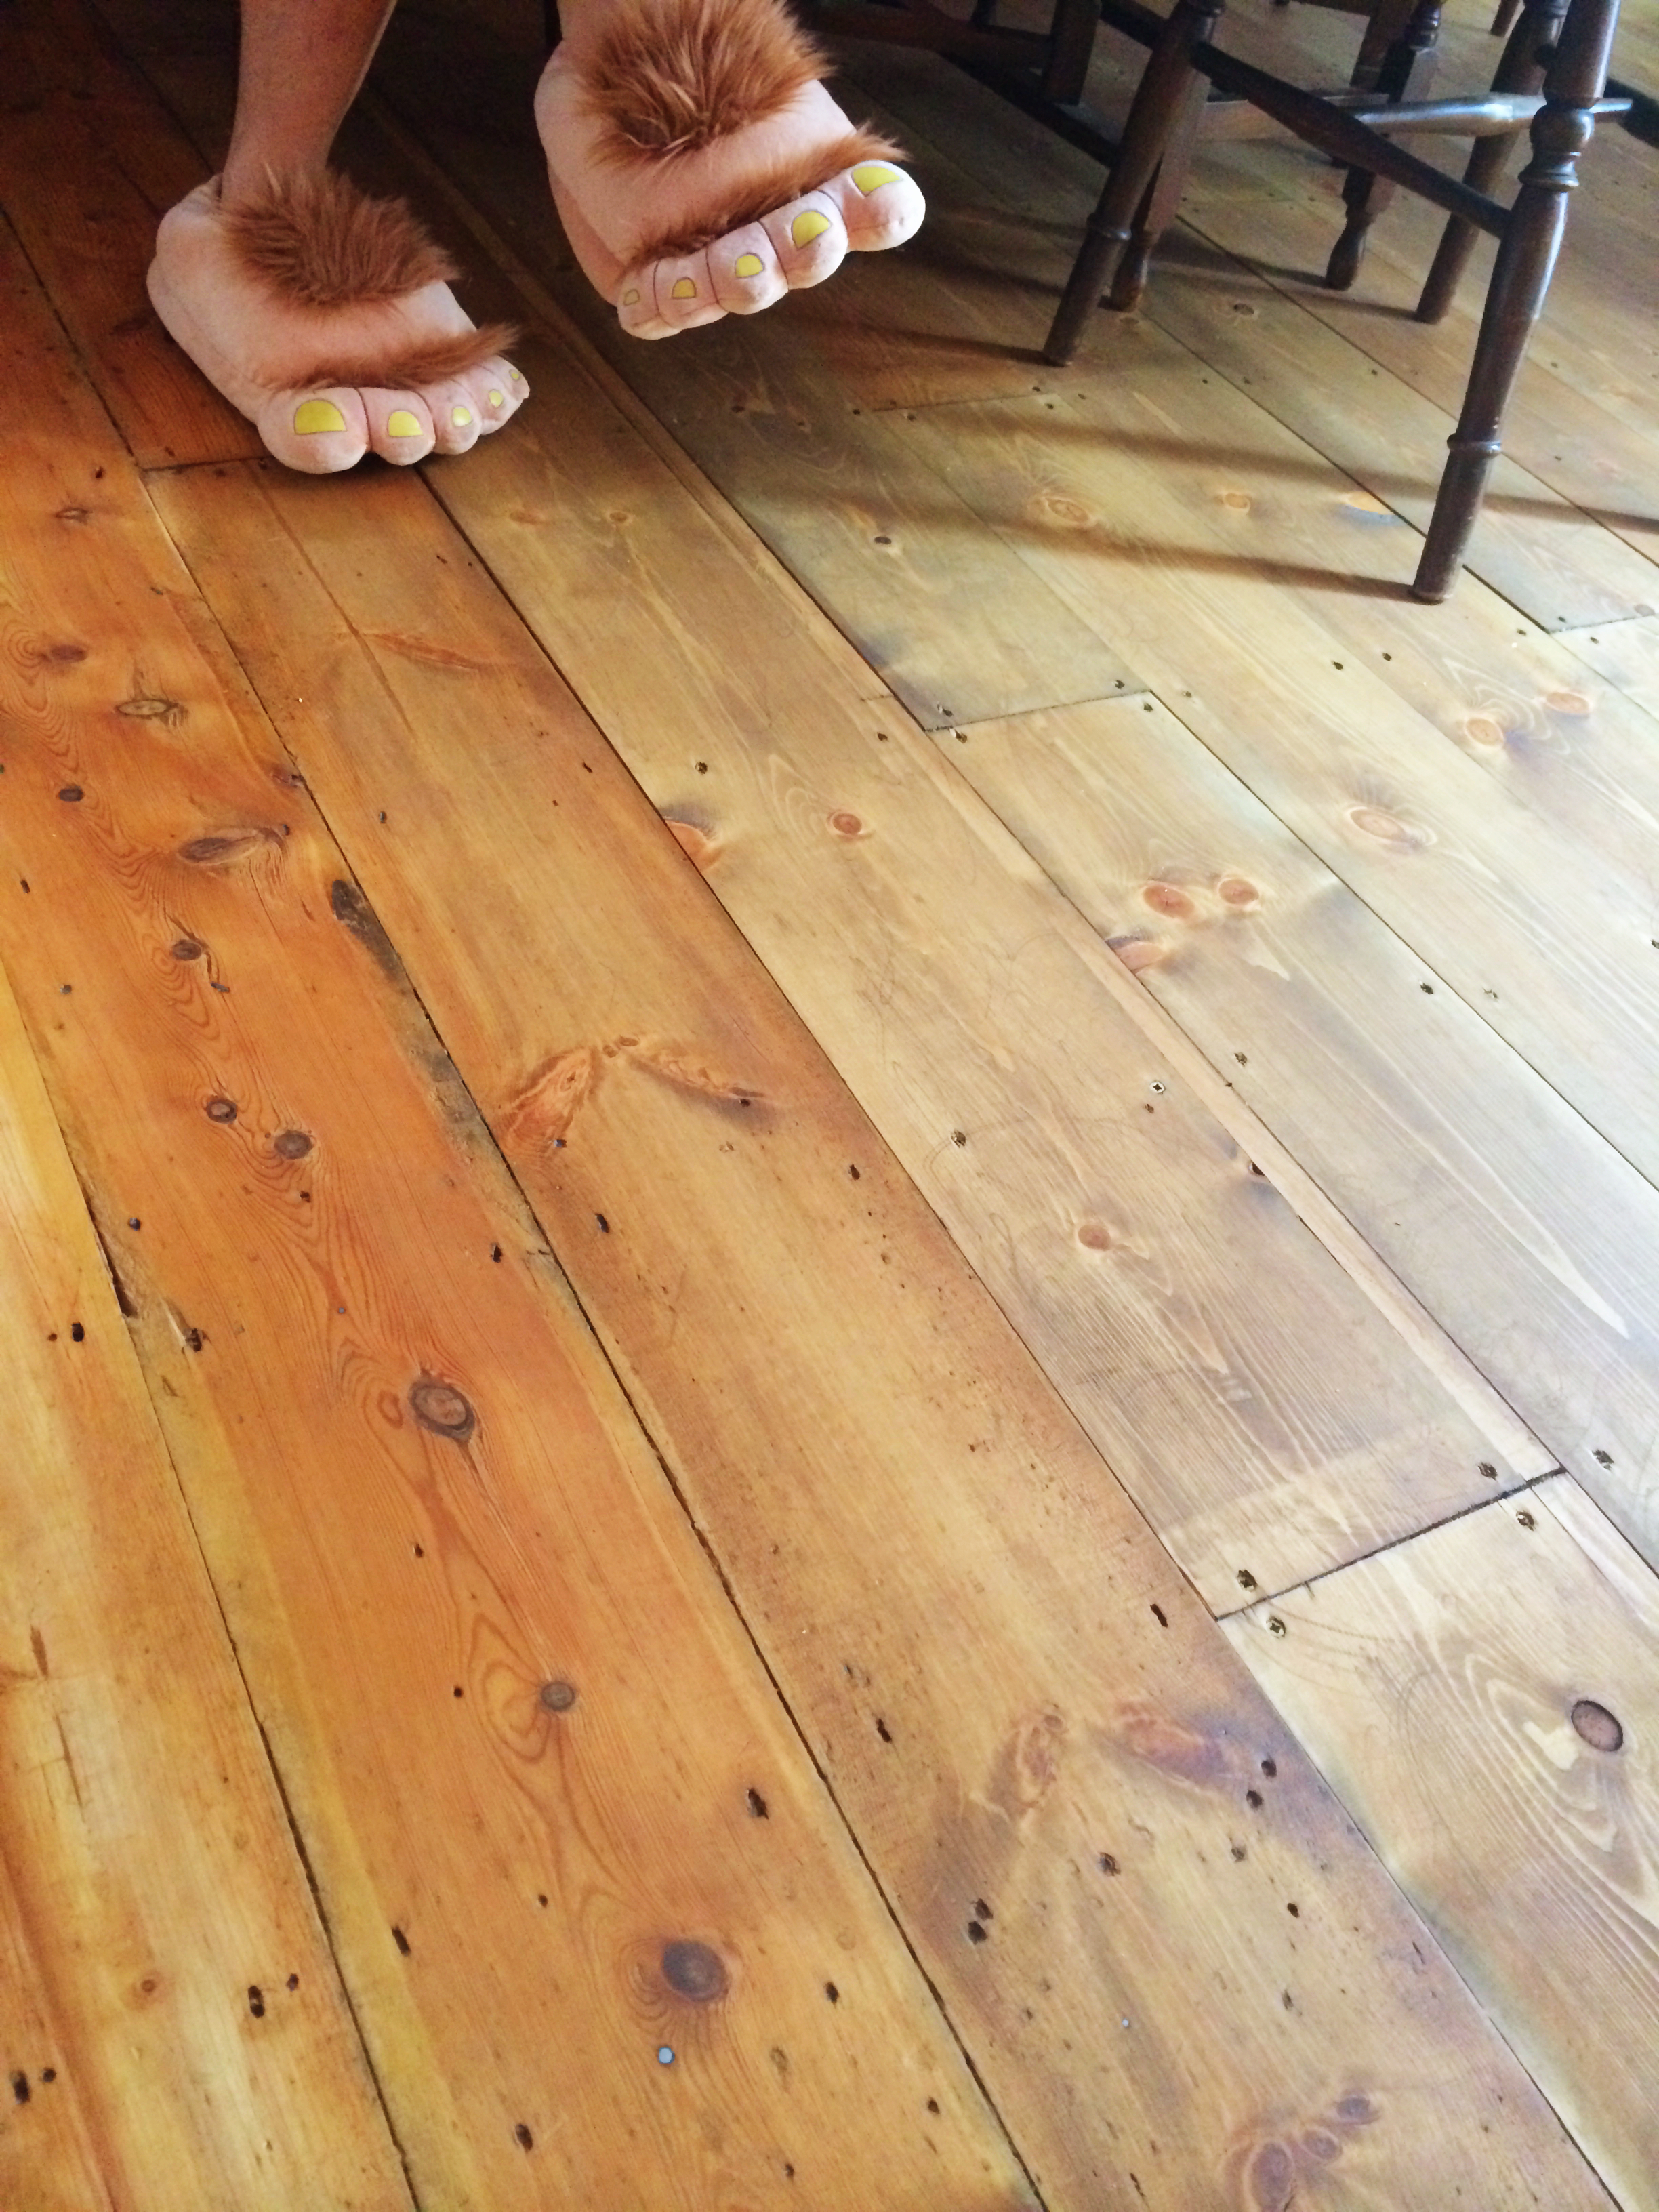
Old boards (nearest) against new boards. And a hobbit’s snuck in there too.

Well, it’s been a long journey, but we have a nice floor now. We both like it. And it’s ready to dance on.


(One of those occasions where the cover is vastly superior to the original. Go Lissy.)


PRODUCTS:
Mann’s water-based floor stain in Victorian Pine
Osmo Polyx Oil Rapid in Matt
Both from wood-finishes-direct.com

endless DIY

Sometimes you have to remind yourself to take a break.

We don’t go out much and we’re not big tv watchers either, but we do have one hobby that will take up as much time as we give it. That’s LOTRO, also known as Lord of the Rings Online. It’s a massively immersive game where you take your character into a rich, visual interpretation of Tolkien’s Middle Earth and there you interact with hundreds of other characters played by other real people, just like you. It’s not everyone’s idea of fun, I know, but we both love it. We play together, helping each other out and fighting orcs, goblins and trolls together. We could easily (and sometimes do) spend three or four hours playing. And sometimes we take a break for dinner before going back online for another couple of hours.

But when there’s this much DIY on the to-do list, well we tend to limit our game time to an hour here and there. This weekend we had a long session, to the detriment of our sleep patterns… A couple of weeks ago, after long sessions of DIY every weekend, booyaa went on strike, as it were. He downed tools and we spent the weekend playing LOTRO and cooking nice food, and we tried to simply enjoy our house for a couple of days. That was really nice. We’d both like to do that more often.

So we’re talking about rounding up some of the bigger projects. Looking at what we can complete and trying to have some time off before we start anything new.

So, current state of play for the bigger projects.

  • Finish off the dining room fireplace – we’re getting someone in to do that for us. Just waiting for them to slot us into their schedule.
  • Finish off the floor in the dining room – that was supposed to happen this weekend but one of the steps in the process took longer than expected and held up the whole project. Hopefully we’ll get the rest done next weekend.
  • Decorate kitchen, dining room, living room and staircase – all in one go, as soon as we’ve got the fireplace and floor finished in the dining room. Again, we’re not doing this ourselves. We’ve got quotes and it’s honestly not worth the hassle. Outsourced!
  • Landscape the garden – we don’t think we can afford to get someone in to do this (though we haven’t requested quotes) and it seems like too much for us to do ourselves, so we’re scaling back our plans and going to build just one flower bed for now. As long as there’s something to enjoy this summer.

Since we couldn’t work on the newly-sanded floor this weekend we spent about half of our time doing some of the smaller jobs that have been on the list for weeks. Plenty of things we’d started but never finished, or we were waiting for something to be able to complete it. Or just excuses ;) But we tore through a bunch of stuff:

Re-fitted the bedroom blinds and curtain poles (one of the blinds had a dodgy mechanism so we were waiting for a replacement; in the meantime we realised we’d have to move it around so that we could the drill into the tight corner we had to deal with). Now, to make the curtains. (Procrastination klaxon!)

We have a built-in cupboard in our bedroom. It’s just a rack of shelves in an alcove, nothing fancy. We’ve had each of the shelves piled up with bags of out-of-season clothes, spare duvets, guest bedding and so on. But we have so little clothes hanging space in this house, just the one tiny wardrobe, that we decided to convert it into a wardrobe. We’ve put two rails in, one at the back and high up for dresses and coats and the other at the front lower down for shirts. It’s a bit weird, but the space was too deep to waste. We’ve still got the highest and lowest shelves to use, too. So all in all, it’s maxed out all the possible storage space.

Following on from this, we sorted through some of those bags of clothes and bedding and vacuum-bagged as much as we could. Each of the bags then went into a plastic box and in the loft, out of the way.

Emptied the garden shed. We didn’t have much choice about this: someone answered our ad on Gumtree, so it had to be done! With any luck they’ll also take some of our gravel to use as a base for the shed.

booyaa fitted the TV bracket in the living room. We started this weeks back, but the wall crumbled and we had to fill it with polyfilla, then we couldn’t get the huge bolts lined up and had to redo it. Ugh. It’s a very unforgiving piece of kit. You need a specialist drill bit and screwdriver because the bolts are so long and the slot is too wide for your average screwdriver. But at last it’s up and the tv is hidden away in the alcove. We can stop using the hallway shoe cabinet as a tv stand, to my immense relief.

Lastly, we hung up the hanging plant pot in the bathroom for our spider plant. It’s been sitting on the windowsill for weeks. Tiny job, but still.

And that’s where we’re at with tiny jobs. Next weekend we’ll revisit the dining room floor. The major jobs on the list will take up the next four to six weeks, but we’re not doing most of it, so it looks like we’ll get our weekends back very soon. Hurray! More time to enjoy the work we’ve done so far.

utterly floored

This has been a ton more effort – and cost – than we’d anticipated. It goes in four stages: ripping up carpet and repairing floorboards; sanding the floor; finishing with varnish or paint. Here are stages 1, 2 and 3.

Three weeks ago

ICKY CARPET
The carpet in the dining room and up the stairs smelled of cat pee (even after dousing it repeatedly with a cat-pee treatment spray) and was a depressing beige colour. Both of us had decided we wanted to pull it up and restore the floorboards underneath. Bare floors look great and are easy to keep clean – and since we’re planning on getting a pair of puppies soon it’s a more sensible option.

What concerned us, though, was that in a number of places you could feel a depression in the floor under the carpet. I was worried we’d have unusable boards. We did a quick exploratory carpet lift in the tiny square at the bottom of the stairs and our hearts sank. It was covered in two pieces of board of the sort you’d use to board out a loft. Boards on the floor, yes. Floorboards, no.

A week later we removed the whole carpet. We cut it into strips and rolled it up. It’s in the shed. Another thing that needs to go to the tip. What we found when we lifted the carpet was a fairly decent if dirty and smelly floor. We let it air for a few days and then I gave it a really good scrub. It came up a shade lighter and didn’t smell quite so musty. Progress!

floor-removing-carpet

Pulling up the carpet

We had a look at the state of the boards and tried to work out what we could hope to achieve with what we had. Some of the boards were badly damaged where they’d been crowbarred up to, presumably, lay pipes for the central heating. Some of them had dozens of nails in. Dozens. Ridiculous. One of the dips in the floor turned out to be due to a board being more sunken than its neighbours. The other dip was slightly more problematic. One corner of the room had the floorboards replaced. The replacements, it turned out, were all cut to the same length and thinner than the original boards next to them, hence the sudden dip.

Floorboards with damaged edges

Floorboards with damaged edges

floor-patched

Corner patched with boards of the wrong depth

Last week

REPAIR AND REPLACE
We called in handy Mr Joiner-Painter for a consultation. His verdict fitted in with what we’d anticipated: lift the skinny boards and use them to board the bottom of the stairs and relay the whole section on the far side of the dining room so that the boards don’t all join in the same place. We’d need a few new boards to fill in the gaps.

Mr J-P came and started taking up boards and cutting and refitting them. He re-used as much he could then took me to the timber yard at Kent Blaxill (a local trade supplier, like B&Q for grown ups) to choose our new boards. It was quite exciting. I flirted shamelessly with the guy on the till and got a 10% discount usually only for trade customers. Result!

Back home with the new boards, and Mr J-P got on with laying the new boards. He proclaimed the joists in good nick; some of them have been replaced in the last 10 years, he says. So with the joists, the new boards and repaired original boards the dining room should have a sturdy floor for another 100 years.

floor-new-boards

New boards laid

Saturday

SANDSTORM
During the week we read blogs and FAQs and DIY forums until we were blue in the face, then booyaa ordered a drum floor sander and an edging sander. We guesstimated the number of sheets of different grades of sandpaper we’d need based on advice elsewhere. We had the sanders delivered on the Friday so we could start on Saturday after breakfast and finish the job by early evening. We were both hoping we’d get it all done in one day, but knowing we had Sunday to finish off if we needed it was a bonus.

So, Saturday morning we moved all of the furniture out of the room (yet again) and got started.

Everyone said over and over about punching in any nails as even a tiny nail head will tear the sander sheet, and they’re pricey, so you don’t want that. After breakfast we cleared the furniture from the dining room and booyaa got on with punching the nails. This was when we discovered just how many nails were in the floorboards. Ridiculous amounts. Those he couldn’t punch down any further he marked with a chalk circle so he knew to avoid that bit – we’d get as near as we could with the edge sander and after that it would be the mouse (my dinky palm sander intended for furniture restoration).

floor-marking-nails

Marking protruding nails (also: look how many nail holes are in those boards!)

After watching the instruction video one last time, he got his face mask, goggles and gloves on, tested the breaker switch and got going. We’d decided to go the wrong way across the boards first time, since the boards are so uneven. The sander hire video recommends a diagonal motion, but our room is just too small for that to be practical. So, on a clear run with no nails jutting out, he set off. Half way across the room the sanding sheet shredded… Gah! We had a look and saw there was a nail which was probably flush the board, but given how much the sander skims off the top of the board it was too high. Back to hands and knees and punching in nails again.

After the clear up (the sanding sheet was in a million bits all over the floor) we also saw that the edges of the boards which protrude were splintering badly. Change of plan! We decided we’d follow the direction of the boards, at least for now.

It took about an hour to do the whole of the old section of the floor with the coarse sanding sheet. booyaa said that once he’d realised that he needed to pull the machine back to slow it down that it was fairly easy to use.

Then, once he was feeling confident, he went across the boards with the coarse sanding sheet and smoothed off a few of the bigger differences in the board heights.

He went over the old boards again once with a medium sander and then over the whole floor, including the new boards, with the finest grade sanding sheet. After copious vacumming we could see the state of the floor. It was looking pretty good, but not, we thought, good enough to be able to stain and varnish. Too many patches. We noticed that there was a dark area at the very edge of the old boards where the sander hadn’t reached.

Now we could see it closely, we also worked out that some of the edges where we thought the boards had been crushed by a crowbar actually are actually woodworm damage. One of the patches is so big we’re not sure how sturdy that board really is. We’ll do some investigating and hope that woodfiller will repair it, though we’re both being optimistic and we know it. At some point we know we need to replace at least three more floorboards. At this point it dawns on us that it would have been cheaper (and easier) to have had a flooring company come in and replace the whole floor with engineered tongue and groove. It’s a crushing disappointment. We try to hang on to our reasons for doing this: we’re restoring the original features of the house. That’s the point. I’m not sure either of us is convinced.

Sunday

NEARLY THERE
After breakfast in the garden, a positive outcome of the dining table being out of bounds, booyaa got back into his smelly DIY clothes ready to use the edge sander on, yep, the edges of the room. It isn’t nearly as effective as the main sander. One disc disintegrates, another wears out. Three goes with the edge sander and a two inch strip of floor all along the skirting board remained resolutely dark.

Another close up investigation of the edges shows that they have a greyish opaque finish, and we’ve decided we’re probably up and against old carpet glue. I tried a water-based white spirit alternative, but that doesn’t do anything (serves me right for being so darn eco-friendly, right?). Then booyaa had an epiphany. He cut the coarse sheets leftover from the belt sander and fitted them on the edge sander. It worked! We’re left with a few tiny patches which I’ll work on with the mouse over the next week.

sanded floorboards (and booyaa's feet)

sanded floorboards (and booyaa’s feet)

Next up: woodfiller to patch the damaged boards. Stain the new boards to blend in with the old. Varnish. Avoid the floor for a day while the varnish dries… Tune in next weekend to find out how it’s going.

I bet you look good on the dance floor…

Firestarter

We want to install a woodburner in the living room so this project feels like a practice run. We decided to open up the fireplace in the dining room. We don’t need a fire there, I just want an empty brick recess where a fire would’ve been. It seems strange to me to have a chimney breast and not even a nod to its purpose. In my head I envisage something like this:

beautifully finished fireplace – from moregeous.wordpress.com

beautifully finished fireplace – from moregeous.wordpress.com

or lovely bare brick chimney and look at all that vino!

or lovely bare brick chimney breast – and look at all that vino!

We look up information on chimneys and fireplaces. We read blogs of people who’ve already done something similar. We trawl through the DIY forums and watch some timelapse of people renovating a boarded up fireplace. Then we gird our loins and go for it on Sunday after breakfast.

We move everything out of the way and since we can’t find the plastic dustsheet from painting we cut up bin bags to seal off the kitchen archway.

booyaa uses a crowbar to prise off the skirting board, which we’ll cut up and refit once the chimney breast is replastered around the new fireplace recess.

booyaa gets his dust mask and gloves on and starts chipping away at the plaster with a chisel. Great sheets of plaster come loose easily. We get quite excited that it’s going to be a really easy job.

plaster coming off easily

plaster coming off easily

Ten minutes or so later we can see the board in ‘boarded up’. booyaa chips away a little more to expose the whole board. It’s screwed in (to what?) so a few whizzes of the electric screwdriver and we’ll have an unboarded fireplace!

removing the screws

removing the screws

Oh. Too soon with the fanfare. The boarded up fireplace was hiding a substantial pile of very sooty rubble. Oh lordy.

Barney Rubble

Barney Rubble

So the clean up begins. Two bags of rubble to go to the tip. With no car, that’s going to be interesting. (Edit: it’s sitting in the back lane while we wait for the fairies to take it to the tip for us.)

On the plus side, we found some remnants of what were probably the original hearth tiles. Not a single of one them had survived intact. Such a shame.

probably from the original fire surround

probably from the original fire surround

All in all it took us about 4 hours to complete this part of the project. Most of that was clearing the rubble and cleaning the soot.

clean up time

clean up time

booyaa looked like a Victorian urchin by the end of it. He was taken out to the garden and hosed down. Just kidding. He did have a very long shower and everything he’d been wearing went straight in the wash. He was exhausted and grouchy by the end of it. It’s not a project for the faint-hearted. Pie for dinner definitely helped soothe some of the aches.

Next steps

Given the amount of rubble we found and the gusts of wind that come down the chimney now the board is off we’re slightly concerned about the safety of the chimney. So we’ve arranged for a fireplace and chimney expert to come and tell us if we need to do anything with it.

Then we’ll tidy up the exterior, scrub the bricks and seal them with acrylic varnish, replace the skirting on the chimney breast and voilà – all done.

Further reading

Here are some of the places we found useful information about opening up a boarded fireplace.

Good photos of each step at this home renovation blog.

Little House on the Corner. We love this blog. They’ve already done many of the same projects as we have planned, and in a thoughtful modernising-whilst-being-true-to-the-heritage-of-the-building way that we hope we’re doing too. Here they’re installing a woodburner and achieving a modern, crisp finish.

Also useful was this Reader’s Digest post. (I know! Reader’s Digest being useful. Whatever next.)

And finally, for sanity-checking, we read through the Stove Fitters’ Manual.

(Aside: I recently heard an anecdote of a colleague saying, “Why does anyone bother writing a blog these days, who cares what you have to say?” etc. It struck me just how helpful it’s been for us to read other people’s blogs. I am eternally grateful to everyone out there blogging their renovation projects. Keep doing it! Ignore the sceptics. Haters gonna hate.)

the inconstant gardener

You know this bit. The “garden” is a space full of gravel. It’s not a gravel garden, it’s not a garden.

We made some tentative plans, let them sit for a bit and revisited them. One of the things we’ve changed is because, having lived here for nearly two months now, we can see that the garden is in shade for much of the day, so the bright, sun-drenched patio and sun-loving plants we’d planned aren’t going to work.

The wannabe garden is still full of gravel. So far nobody wants to come and take it off us. In the meantime we’re sowing seeds, buying plug plants and slowly working towards building the garden we want.

There’s an incline from the house to the end of the garden. A couple of houses down (you can see it across the fences; they’re all quite low here) they’ve built a raised patio at the top end of their garden, so basically creating two levels. And that’s exactly what we’re going to do too.

We’re trying to source a couple of hefty sleepers or rough hewn timber to create the retaining structure for the step up. You can buy sleepers, new and reclaimed, online, and they’re not that expensive, but the delivery costs are extortionate.

Once we’ve got the timber we’ll work to flatten the two sections of the garden. Then we can start creating the main flower bed.

I quite like the idea of having two levels, since the garden isn’t generous enough for us to create distinct zones, or ‘rooms’ as garden designers on telly say. We’ve tried to plan into this tiny space a couple of different views, so that you don’t see the whole garden the moment you walk out of the back door. We’ve also defined four spaces, determined mostly by the amount of sunshine that part of the garden enjoys.  We’ll have a patio area, with our table and chairs and the bbq in summer. That’s where there’s light shade in the afternoon for sitting around comfortably, and the last rays of evening sun to make the most of it. Then there’s a grow-your-own section, with the veg planters. They’re sheltered by wall and fence but get plenty of sunshine so they should be fairly productive. There’ll be one main flower bed, with very tall flowers in summer and a couple of shrubs in the centre for year-round structure. It’ll take up most of the garden, so it gets good sunlight throughout the day. Finally there’s a shade border along the right-hand fence, where we don’t get much sun at all bar a quick blast in the very early morning. Luckily we’ve lived with a shady garden before, so I already know a few pretty plants that will fare well there.

To agree the structure of the garden, the basic layout, we used a drawing program on the iPad. It’s called Bamboo Paper and it’s by Wacom, the people who make drawing tablets. We sketched out a number of designs there. You use your finger to draw, erase and annotate directly on the screen, so it really doesn’t get any easier than that. Then, once we were confident that was the right layout I transferred it to squared paper. The benefit of squared paper is that you can draw to scale, so it’s easy to measure and know you’ll fit everything in. I use squared paper for working things out in the house, too, like planning the layout of the bathroom. Sound investment. (WH Smith, £3.)

Here are some photos of seedlings to keep you going until there’s really something of note to show you.


waiting for a permanent home

waiting for a permanent home


three rows of salad crops

three rows of salad crops

kitchens of distinction

We’ve got a new kitchen!

We haven’t bought a new kitchen. We’ve upcycled what we had.

We renovated one worktop and installed one new worktop which we needed in order to fit the dishwasher. Then we had the cupboard doors painted and added new handles.

The kitchen is from Ikea, I believe. A bit of detective work shows up Ikea stickers here and there and I recognised the handles. So it’s not going to last forever. I think Ikea is brilliant at getting you a well-furnished, good-looking home on a tight budget. Most of their cheaper stuff doesn’t last and the more substantial stuff fails on the surfaces. Things tarnish and scuff easily. At least, that’s my experience. This kitchen is sturdy enough. The soft-close mechanisms have failed. The paint finish has worn or cracked in a number of places. What looks like steam damage had made the cabinet above the cooker swell. One of the drawers looked to have swollen in a similar way, making the edge all wavy.

So, we sanded off the swollen bits, took off the very boring handles and polyfilla-ed the resulting holes. There’s a small cabinet without a door where the microwave sits, so we filled in the spare holes there, too. It looks much neater.

Then Mr joiner-painter came and did the painting. The original colour was a light cream, and the top cabinets have been repainted in a warm white. That needed one coat of primer and two top coats. The bottom cupboards were painted dark grey so that took two coats of primer and two top coats.

Details

Top cabinets are painted in Farrow and Ball Wimborne White.
Lower cabinets are painted in Farrow and Ball Down Pipe.
Cupboard handles are large ceramic knobs in Lime Zest from theseplease.co.uk

Cost

We could have had new doors made fairly cheaply, so was it worth it to do it this way?
Paint. There’s still plenty of primer and paint left over, and it will get used on other projects. It’s already earmarked and was planned in advance to keep costs down. But still, it was £74 for the two cans of primer and two cans of paint.
Mr joiner-painter charged us £140 for a day and a half of work.
The new handles cost £33 (we needed 11).
The new worktop, joinery and oil all together came to £220.
So, not quite a new kitchen but it certainly looks like it, and all for under £470.

Verdict

The colour of the lower cabinets is just stunning. On the website the paint colour looks like a darkish, dull grey. In real life it’s a beautiful, rich colour. It changes depending on the light — I’m finding this is a speciality of F&B paints — from a greenish grey to a deep bluish grey to almost black. The top cabinets are a warm white colour. They don’t change as much as the lower cupboards, but the overall effect is a clean, bright not-quite-white.

This is the kitchen on the day we moved in.

Day 0: kitchen

Day 0: kitchen

This is the kitchen this morning (I was going to wait until the kitchen was clean and tidy, and the shelf next to the microwave needs putting back…. but you might never get a photo if I wait until it’s perfect.)

kitchen-after

You’d think we’d had a new kitchen fitted.

Close up of the drawers with their new shiny handles.

drawers smoothed, painted and sporting their new handles

drawers smoothed, painted and sporting their new handles

tools of the trade

Planning and costing is quite a complex business.

You need to work out what to do first. You need to get quotes or check multiple places online. Then you need to agree which one you like best or work out a budget. There are lots of lists, snippets of information, emails in different inboxes. How do you keep track of it all?

We use spreadsheets on Google Drive to make detailed cost calculations. We generally have a list of requirements down the left, so for the new bathroom, for instance, it would have lines for the various trades, each of the items of sanitary ware, floor and wall tiles, paint, cabinets, accessories and so on. Then we have two columns, one for the budget option and another for the one we’d really like, or if it’s a ‘nice to have’. Then we have links to products. That means we can calculate the cost fairly accurately and we know when we’ll be able to afford to do that. We can decide if we’d rather wait and save a little longer so that we can pick from the top-end column.

Spreadsheets are fantastic for this kind of thing. We use the online version purely because that way it’s dynamic: we can both edit them and see the changes in real time. If you have a gmail account then you have access to Drive. You could share a static file on Dropbox or similar instead.

For jobs we’re going to do ourselves or other house-based to-dos we use Trello. By default you get three columns in Trello: To do, Doing, Done. You can colour-code cards (that’s a single item) so we’ve got ours linked to different rooms and projects. You can comment, add notes, assign to someone on your team, set a deadline and more. It’s really useful. I mostly use it on my laptop, but the iPhone app is fully functional. It’s a free service, you just need an email address to create an account.

To get started, create your board and assign it to the team or invite interested parties so that they can see everything on the board. Make a card for every to-do. Colour-code or sort them according to your needs. If you have a complex project you could set up a separate board for that so that you can have different labels and rules. You can create/name your own columns per project on one board, but to be honest I’d have a different board for each project instead so you still follow the to do/doing/done method. As you tick things off you move them across the columns. It’s a very satisfying end to the weekend, dragging items to the Done column.

The last thing I’d add is that for bigger changes, whether they’re big on work or money, then mulling things over, sleeping on it, is always worth it. Just because you’ve planned it, doesn’t mean you can’t change your mind if a better, neater, or cheaper solution comes up. So give it time. For me, the desire to want everything done right now is tempered by perfectionism, wanting to get it right first time. So we never make a final decision straight away. We come back to it a few days later and see how we feel, or leave it on a to-do list until we know we’ve exhausted all our options.